
9 Tips for Photographing the Oregon Coast
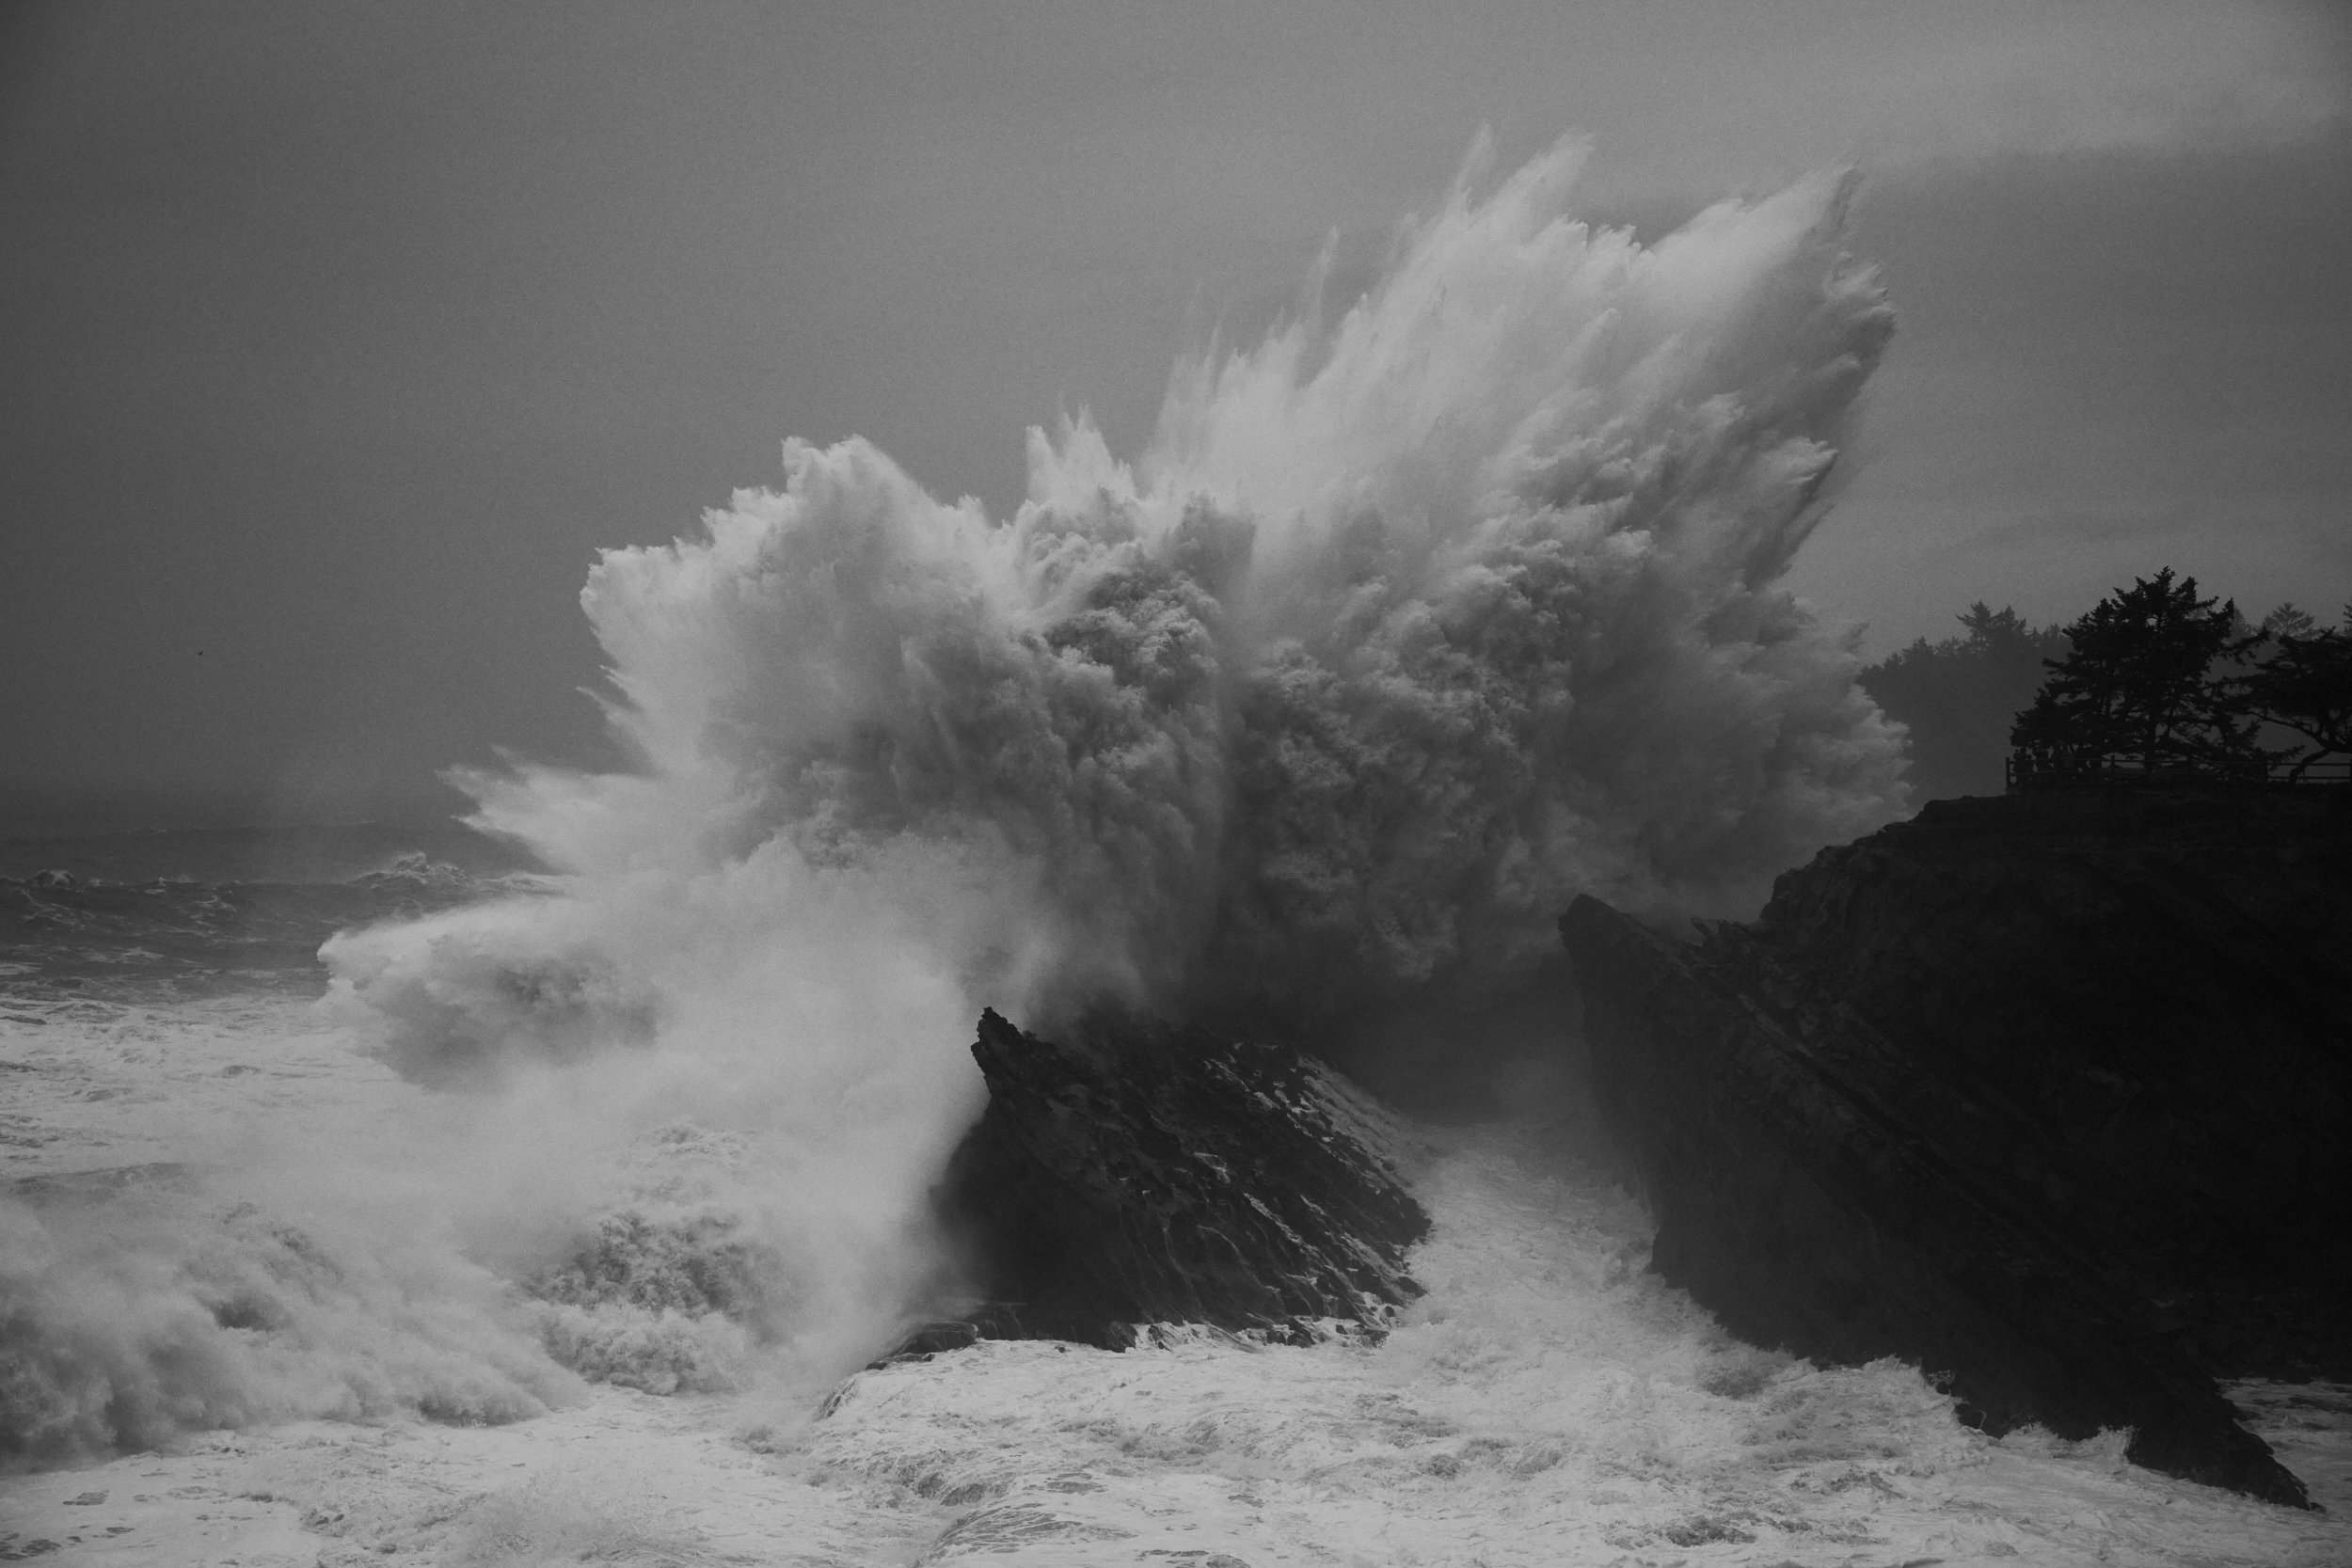
If you see a storm in the forecast it’s a good opportunity to take some pics on the Coast while feeling salty as hell. Image at Shore Acres, Oregon.
I wrote this after a recent trip to the Oregon Coast where rain, wind, and tempestuous seas made for some truly spectacular photos. Few people venture out into this type of environment for it can be too monochromatic (grey), cold, and wet. What’s the point if there’s no golden hour?
From hiking the Oregon Coast to being stationed here with the U.S. Coast Guard, I have plenty of experience being uncomfortable, let me help you in your journey to the Coast. Don’t wait for summer, get out there and have fun!
This is meant to be helpful NOT CLICKBAIT so each step is fairly in-depth (especially the first two). The steps are less focused on detailed photography techniques and more focused on useful tips for taking pictures in this type of environment, what works for me may not work for everyone, so please adapt as you see fit and share your ideas in the comments below! Feel free to skim or really get down into the sauce and enjoy.
Tip 1: Dress Up Sailor!

Blake donning a Coast Guard drysuit and pointing at nothing. Yaquina Bay, Oregon.
The photo above is EXCESSIVE; regardless, it’s important to dress appropriately. You’re about to get wet, and when you're wet you’ll get cold quickly. Wear plenty of layers to stay dry and warm. If you get wet underneath waterproof layers consider a return to your car, camp, or coffee shop.
Say you’re photographing the sea and you lose track of your condition because of your adrenaline when photographing crashing waves. You may not notice that you’re getting cold until the adrenaline wears off. This can lead to a long, brutal trek back to your car and potentially lead to future illness or worse, hypothermia. Remember it’s easier to remove layers than to add the layers you didn’t pack.
This is my go-to outfit:
Base layer of long john top and bottom. They say cotton kills because it absorbs and retains moisture. Find a synthetic or smart wool layer.
Sturdy pants and shirt. Note: Wet jeans are NOT COOL.
Wool socks. Wool is a great option for your layers since it’s meant to get wet and retain heat, it’s also antimicrobial so it doesn’t stink. Concerned people often say, “be a lion and not a sheep” but that’s terrible advice, be a sheep.
Wool, however, is itchy business (step 3 “embrace the suck” may help with this discomfort). Even with waterproof boots, my feet often get wet so having the wool sock is especially handy. Pro tip: keep a second pair of dry socks in the car for future comfort.
Waterproof boots are great not just for rain but for treading through the numerous ankle-deep streams that run off from coastal cliffs. I, personally, love the Lems waterproof Boulder Boot with tread.
Warm jacket (puffy) with down as the preferred filling. This can be $$$, and I don’t know where I’d be if a friend didn’t gift me his. I can sometimes get by with the classic Oregon flannel + sweater combo but it doesn’t hold up in lower temps.
A RAIN jacket that is WATERPROOF, not just water resistant. This is going to be a game changer, not just for keeping your head and core dry and warm, but also for preventing the wind from penetrating your multiple layers. This item is absolutely necessary, even on some summer days. The same friend that gifted me a puffy gifted a used Rab rain jacket that has been solid for years.
A fancy rain jacket may not keep you dry forever. You might notice water penetrating the big hole where your face is. A little dampness coming in around the neck, shoulders, and wrists is no big deal, although it’s a warning of the cold to come. If you start getting soaked reassess your situation.
Most heat is lost through your head so keeping it warm with a beanie and hood will do wonders. I use a wool beanie from Sweden-based Fjallraven. I highly recommend this company if it’s within your budget. They do lifetime repairs and offer a 20% veteran discount in-store. I’m a “buy it for life” (BIFL) fan. If I can make one investment that lasts many years I’d much prefer that over fast fashion that creates excessive waste. In the long term you may save money by not having to replace the cheaper items.
I don’t usually use rain pants, but if it’s torrential rain they do come in handy. I tend to dry out quickly with the pants I wear so I’m not too worried about them. When the rain is sideways you’ll soak the lower half much quicker. If rain is straight down you can usually stay somewhat dry.
Unless you’re wearing neoprene gloves, I don’t recommend gloves on the Oregon Coast. They don’t mix well with photography, they’ll likely get soaked, and that’ll be weird. Use those pockets.
REI has great sales for members (you can become a member by paying a nominal one-time lifetime membership fee). REI is typically pricey but they often have 50% off sales and “garage sales” on used quality gear. This is how I got my start into more technical gear. If an item doesn’t fit your needs, or fails after a year, you can return it. Because of this return policy you can find plenty of quality used gear.
Photography equipment
Along with your layers you’ll want to ensure your equipment is ready:
Charge your batteries and ensure you have the appropriate storage.
The lenses and gear you take will be a personal choice. I typically take a telephoto lens, 50mm prime lens, 10-stop Neutral Density (ND) filter (3-stop is handy too), polarizing filter, and a tripod. Wide angle lenses are useful to some photographers but aren’t my style.
Have a rain fly, or dry sack for the sensitive electronics. I can fit my camera cube into a dry sack when things get rough.
You don’t need a photography specific bag. Rather I recommend buying an insert (camera cube) and throwing it into a hiking specific bag with a comfy hip belt. This keeps your bag looking less like a photo bag and looks less attractive to potential suiters and robbers.
Tip 2: Check the Weather and Tides

Winter color on the Oregon Coast is rare. Here the sun sets in Bandon, Oregon.
Weather
As of writing this, forecasts are only truly reliable up to 3 days in advance. 10-days can be a nice outlook but more often it’s a rough prediction. I use the National Weather Service (NWS) 7-day forecast for my weather information. This site has a break down of the 7-days, where the upcoming 3-days offer the most detail.
Scroll down the page and you’ll find that there is a radar image, satellite image, and graph of hourly conditions. The graph takes a second to learn but offers great detail about the days outlook. This is also where I go to get my gale, surf, and other storm advisories. If you’d like to schedule a session to talk weather, let me know. I love teaching this.

National Weather Service 7-day forecast example (Eugene, Oregon). Scroll down the 7-day forecast to see the additional resources. This is great for satellite, radar, and hourly weather information.
Tides
For tides I use the National Oceanic and Atmospheric Administration (NOAA)—here’s a link to the tide charts for Oregon. Consider your location, say you’re bopping around Florence, you’ll select the Siuslaw River entrance to get the appropriate chart (there will be an example image below). Think about the placement of these spots. If you’re on the beach in Florence, you’ll want a location close to the Ocean, not something inland. Often the best locations are at a jetty (river) entrance where boat crossings become the most sensitive.
Tides in Oregon can vary dramatically (many feet at a time as compared to the East Coast) and because of this, a lot of people get themselves into trouble. In the Coast Guard we often had folks climb on rocks during low tide—they don’t notice the tide is coming in—then before they know it they’re stuck out on the rock surrounded by water, then a helicopter needs to come pick them up, oops.
This can happen too if you’re walking around a cliff edge at low tide and get stuck in a cove. Paying attention to your tides is important not just for survival, but for figuring out your photographic approach (I’ll describe this further in a moment).
Tides and storms can be dangerous and increase your chance of getting caught by a sneaker wave and being taken into a rip current. Those waves will f%$*& you up. When I was a kid coming out to the Oregon Coast my grandma — wise salt she was — would always say, “never turn your back to the ocean”, then proceeded to let me play in it.
An example of a tide chart
Low tide is the bottom of the curve (in feet), the travel up the curve to the high tide is the flood; water is coming toward the coast (when people lose track of the flood they can get trapped), high tide is the top of the curve, and the way down is the ebb; water is moving away from the coast. Slack tide refers to the stationary moments at high and low tide.
By understanding tide charts you can see how tides change with new and full moon phases and the rarer, intense king tides (great for waves crashing on rocks) and extra low, negative tides (these tides are great for super secret Neptune treasures of the gods like nudibranchs in tide pools). PLEASE, ALWAYS practice proper tide pool etiquette.

Example of a NOAA tide chart for the Siuslaw River Entrance, Oregon.
Note: Oregon waters are frigid. Hypothermia in Coastal waters will set in within minutes. Unlike the East Coast, water temperatures don’t increase in the summer, so what may feel warm on shore will turn disastrous in the water. If you find yourself in the water swept out to sea, try and enjoy your last moments surrounded by the sea critters and nice views.
The benefits of high tide:
Crashing waves into rocks and cliffs.
Abstract photography possibilities i.e. close up long exposures of water over rocks.
As the tide ebbs (goes out) it often reveals gifts washed ashore from the high tide (especially after a storm).
The benefits of low tide:
Tide pools. Honor tide pool etiquette and watch where you stomp. Leave the critters alone and don’t pick up starfish with your dirty sailor fingers.
You can have more sand to yourself because the beach is accessible.
More wildlife. Seals and such bathe on rocks and you can get closer. Just remember: if they can see you, you’re too close. Use your telephoto and be sneaky; you are a spy. As a species we’ve occupied almost every inch of land, let the animals have their moment at sea.
Be cautious of flood tide. When the tide moves from low to high you may get stuck. Know where you are and have the exit planned.
Tip 3: Embrace the Suck

This photo is from Iceland, yet it’s the same trouble.
Ok we’re finally into the shorter steps, PHEW! “Embrace the suck” is something military folks say to themselves to pretend like they’re doing ok. It’s a recognition that you’re in a shitty situation, but the faster you accept the discomfort and learn to love it, the faster you can enjoy what’s beyond. The Oregon Coast is familiar misery to me, I’m used to it at this point, but for someone new to Oregon this can be a jarring experience, especially the wind and heavy rain.
Show up ready to embrace the harshness of the Oregon Coast but accept that there is a beauty in that, a beauty that many will miss. Many of us miss merging with the world by staying trapped in comfort. A storm can be terrible but with that terror adds a new layer of drama to your photographs.
Real world example: If you’re in wet jeans and all you can think about is your wet jeans you’re going to go mad. Instead reframe the wet jean scenario and say to yourself: “Hey this is gross, but we’re out here photographing some cool seals, so that’s pretty neat!”

“That’s pretty neat!” Remember: if they can see you, you’re too close. Image near Yachats, Oregon.
Tip 4: Arrive

In the rush of reaching and photographing a new location I often fail at this step, but I wish I wouldn’t so I’ll add it here to help integrate it into my process. Observe your location on arrival. Show up fully before you pull out the camera or set up the tripod. Sit in a meditation of sorts. Absorb the beauty of your surroundings through sight, smell, and feel. You are in nature’s temple and it’s going to request that you observe it respectfully.
What does this environment instill in you? Is it moody? Bright? Colorful? How can you honor it in photographs? What stories is this land telling you and how can you convey those stories?
Set a timer for 5-10 minutes (or more) and sit still. As photographers we often blind ourselves behind the camera and fail to look up. It can feel as though we’ve experienced something grand but the whole time it was lived through a viewfinder. You don’t need to photograph EVERY moment.
Example: If a whale is passing at a distance and you don’t observe and instead try to photograph, your photo will likely look like a rock with a bit of water spouting out. This isn’t worth photographing. The memory of it will do you much better. Put the camera down and settle into this moment.
Tip 5: Changing Lenses

To change lenses or maneuver equipment (such as adding filters, or adjusting the tripod) find some tree cover. Just a few feet from most beaches are areas of dense trees and brush that do an excellent job of protecting from mist, sea spray, and rain. If I need to change lenses I avoid doing this on the beach due to blowing sand, salt water, and rain. If the car is nearby that is a solid option too.
For many years I shot on the Oregon Coast without a weather resistant camera. While I’ve never had trouble with water or corrosion, I was always nervous. I now use a camera that is weather-sealed and it gives me some peace of mind. I still recommend keeping it in your raincoat between shots, or, if on a tripod, find a plastic cover for it. Umbrellas will get wrecked by the wind so don’t even think about it.
Tip 6: Play with Shutter Speeds
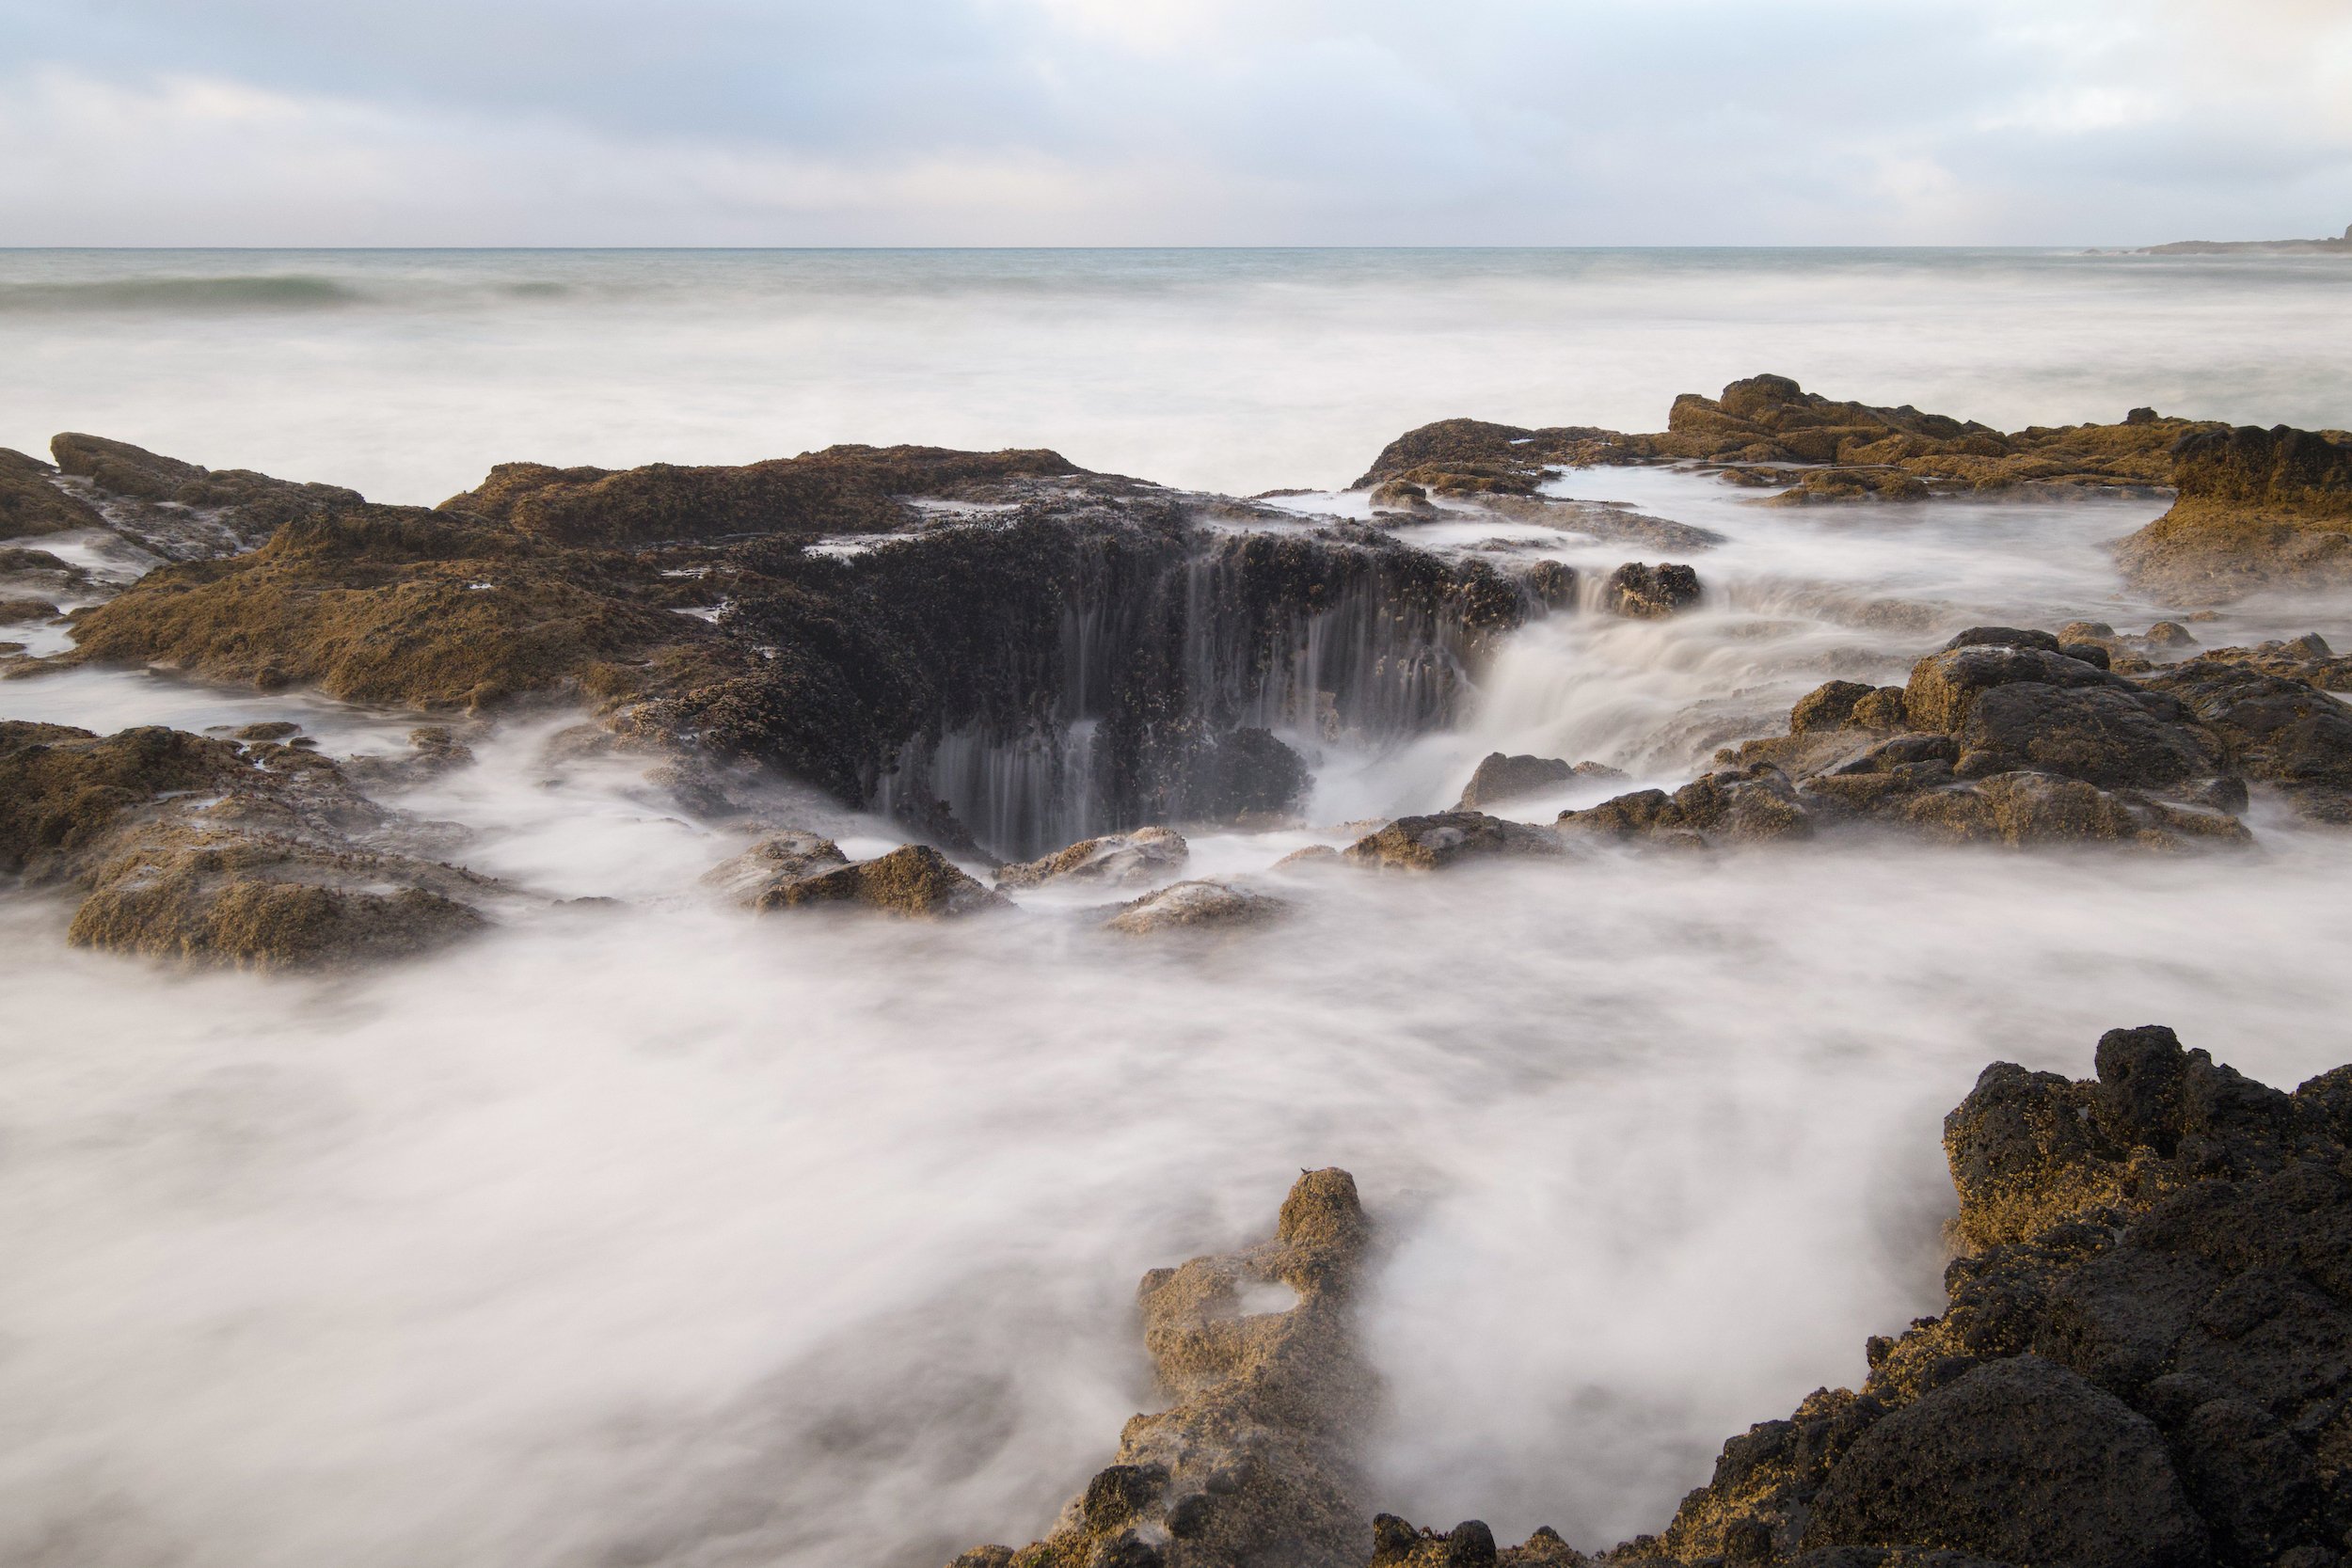
A slow shutter turned this rough water into a calm mist. Thor’s Well, Oregon.
You can add drama into your coastal photography using fast or slow shutter speeds to work with the water, clouds, and fog.
Fast shutter speeds
A fast shutter allows you to freeze the action and capture the detail and ferocity of the sea. I recommend a shutter speed of 1/1250s and up to freeze a wave’s motion. You may need to open the aperture to let in more light, or raise the ISO.
Don’t fear taking the shot because you’re at a higher ISO. Many landscape photographers will advocate for the lowest ISO for the best picture quality. While this is true, don’t forgo the shot because you're at a high ISO. I consistently sell prints at high ISO; nobody is going to pixel peep as much as you, or possibly another photographer, but those photographers aren’t buying your prints.
Slow shutter speeds
A slow shutter can turn an ocean scene into a dreamscape. Using shutter speeds of 1” to 10” and above will add motion blur to the photo (1”), or turn it into mist (10”). You can wait for blue hour/golden hour to get the proper darkness to lower the shutter speed this low. Or you can apply a neutral density filter (ND). I recommend a 10-stop ND for turning the water to mist. A 3-stop ND will retain a bit more detail in the water but leaves some motion.
To set this up use a tripod (or other stable surface), turn on a 10-second timer (so your camera can stabilize after pressing the shutter), and turn off in-body image stabilization. You may need to stop-down (increase the f-stop). If wind is outrageous these types of shots may be impossible, maybe you can embrace the blur, the abstract?
Note: When buying filters I recommend buying the largest thread you think you might need for future lenses. For example buy just one of each filter at 77mm, then buy a step down filter to apply that same filter to smaller threaded lenses. This means you only buy one of each filter and you save money by buying the cheaper step-down ring to apply that same filter to every lens.

Fast Shutter: Fujifilm X-T3 50mm 1/2000s f/2 ISO 100

Slow Shutter: Nikon Z8 50mm 10-stop ND 8” f/8 ISO 100
Tip 7: Look Closer

A mushroom sprouts near Newport, Oregon.
Due to fog, rain, and pure misery, is your day a total bust? Try finding shelter in the trees once again. In the cooler months, especially in the fall, you can find a world of wonder in the forest. Mushrooms grow plenty and can be very unique in color and style. Try looking closer at the forest floor and have a go at some macro photography. Mushrooms like to hang out around rotting trees and dead things, usually just off the trail.
Watch for interesting wildlife in the forest. Salamanders can often be seen traversing the trails and banana slugs will roll up on you quick (jk). Note: don’t lick the banana slug; their slime is an anesthetic and it’ll make your mouth numb.
Tip 8: Keep Moving
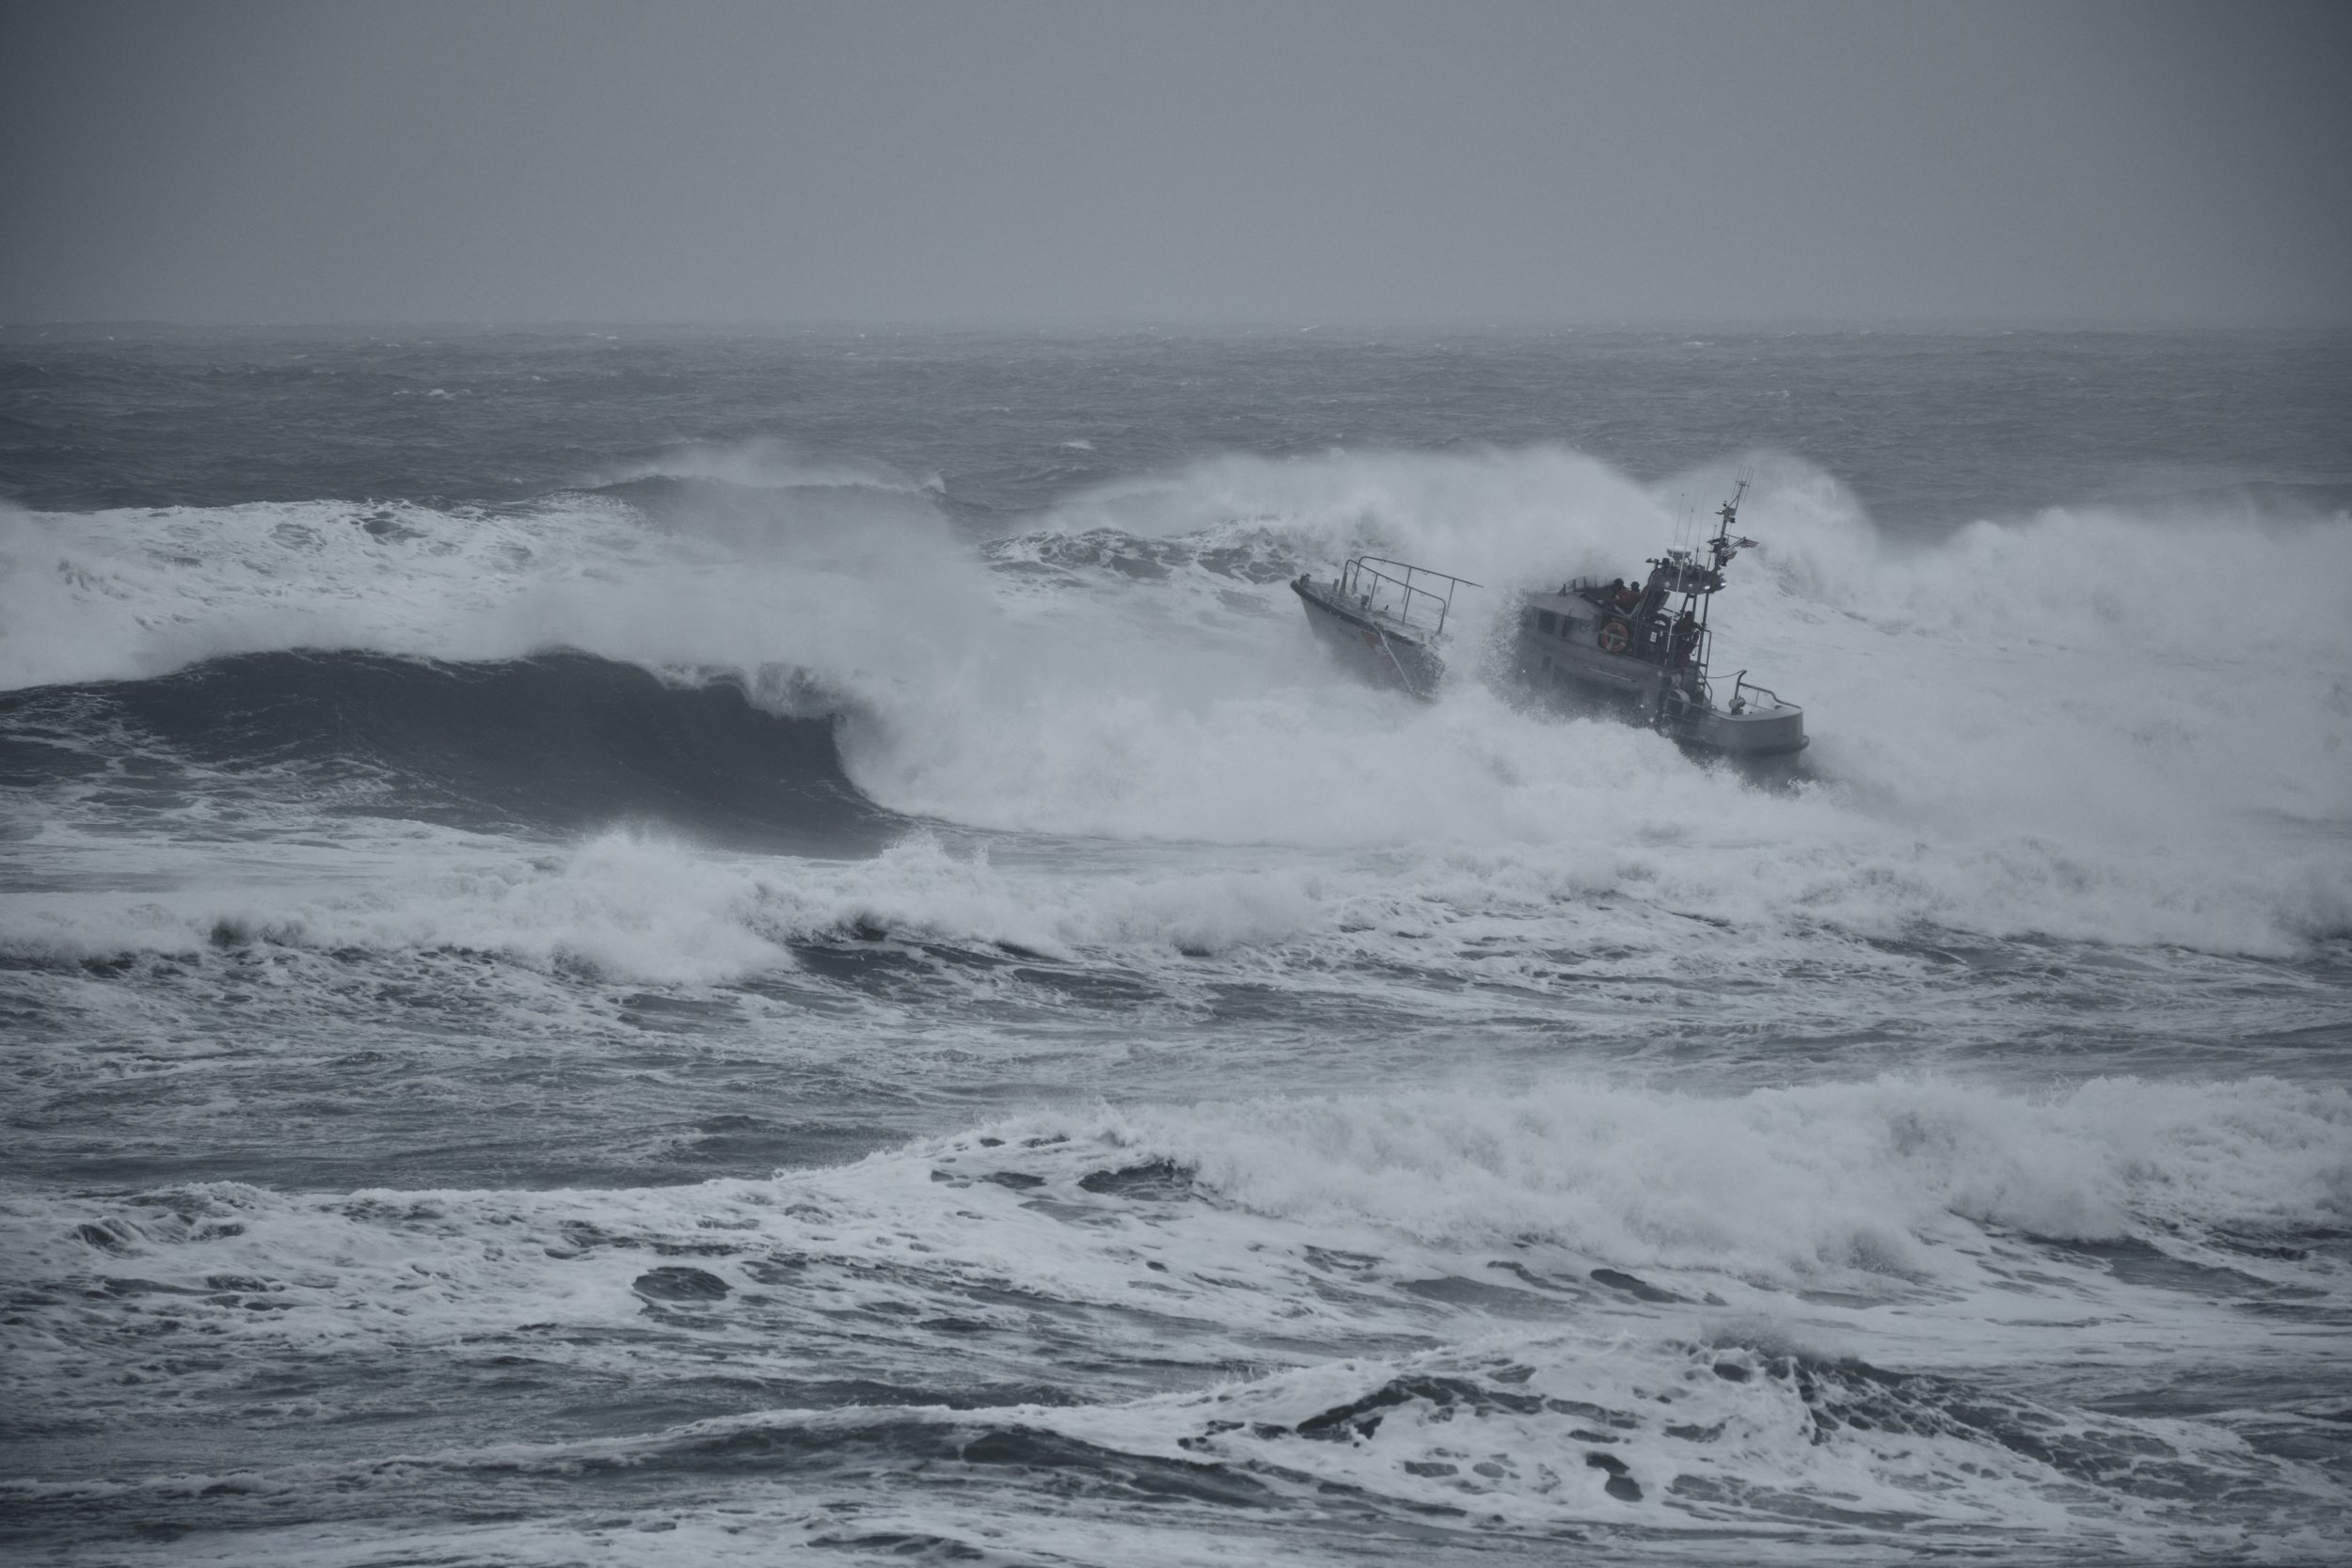
U.S. Coast Guard training in the Surf near Depoe Bay, Oregon.
I have a tripod but I don’t like it. Supposedly you should invest in a nice tripod since you’re putting an expensive camera on it. For years I used a $20 tripod from Amazon and it worked, but the day after I bought a nicer tripod the $20 tripod broke at the neck! So be careful with those cheaper tripods, the saying is true and I was just extremely lucky.
I find that once I attach my camera to the tripod I feel less mobile, trapped by the three-legged stick demon. When shooting at higher shutter speeds I rarely notice not using a tripod. A helpful tip for shooting handheld is to double the shutter speed for the focal length you’re using. Say you’re shooting at 50mm, use a shutter speed at least double that 100, so 1/100s. Keep your elbows and camera tight to your body for stability. You can also use items around you for stability or a makeshift tripod.
I notice many photographers, after setting up their tripod, will just stop, they’ll be in that position for hours. That’s fine but you could be missing other perspectives or events. Furthermore when you’re sedentary, especially in the cold, you will begin to lose heat much, much quicker. It’s important to keep moving, hiking, and exploring. Try to get away from the pristine world of Instagram replicas and find new vision.
Tip 9: Shoot or Edit in Black and White

Cape Arago State Park, Oregon photographed in black and white.
Help a banal scene emote. As mentioned above, on these dreary days the color of the Oregon Coast is already starting to appear a monochromatic grey. Fog, haze, and mist add to the epic of a Coastal black and white photograph. If you shoot the RAW + JPEG setting in your camera you can have the original color version along with the black and white JPEG ready to print.
Some of my favorite and often best-selling prints are unedited JPEGs straight out of camera in black and white. It goes with a variety of wall space, but also evokes more emotion.
Bonus Tip: Cozy Up and Dry Out – Hygge

What’s more Hygge than a Scandi woman in a wool sweater drinking tea?
Hygge is the Danish and Norwegian art of contented coziness. Blankets, fireplaces, hot cocoa, books — all that adds to your hygge. Once you finish with your day and need to dry out, take a moment afterward to put on some dry clothing, grab a coffee, tea, or what have you, and cozy up.
This is a good time to wipe down your camera from the salty air and moisture of the day and leave your camera out to dry. Find comfort here and practice taking a moment to reflect on your time spent with the Ocean. Bring a notepad and write your reflections.